Tag: doctor blade installation

  • Doctor Blade Installation

    Doctor Blade Installation

    Back to the basics with this doctor blade installation and best practice infographic, created by Flexo Concepts. This infographic is a simple 3-step guide to proper TruPoint doctor blade installation in a chambered ink system. We also offer helpful insight on the ideal blade orientation and blade pressure to prolong doctor blade life and ensure effective ink metering.

    Complete the form to download this infographic – with this download, you will also have an option at the bottom of the graphic to print the installation guide on standard letter size or poster size paper. This graphic is a great resource to print and post by your press operators to facilitate accurate doctor blade installations.

    3 Keys to Success Doctor Blade Installation Guide
  • The Right End Seals Will Prevent Leaks in Your Doctor Blade Chamber System

    The Right End Seals Will Prevent Leaks in Your Doctor Blade Chamber System

    End Seals
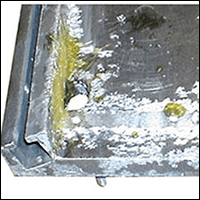
In an enclosed doctor blade chamber  system, the job of the end seals is to keep the coating or ink from leaking out of the ends of the chamber.  Selecting the right end seals for your application is critical to achieve proper doctor blade seating and prevent leaks.  If used correctly, these inexpensive consumables will ensure graphic quality and save a printer thousands of dollars in waste, downtime and replacement of other press parts due to premature wear.

    Problems That Result from Failed End Seals

    • Chamber leaks and mess
    • Poor graphic quality and ink/coating waste
    • Excessive doctor blade wear
    • Premature anilox roller wear and scoring
    • Press downtime

    Why Chamber Leaks Occur

    While there are other causes of chamber leaks, failed end seals are responsible for the lion’s share.  It is important to use an end seal material that is compatible with the type of ink or coating being used, the length of the run and the press speed.  Good seal design for a proper fit is also critical to ensure that end seals contain the liquid within the confines of the chamber.  Incorrect end seal size and shape will leave gaps for fluid to leak out of the ends.  If the seals aren’t sufficiently lubricated, the increased friction against the anilox roller will cause buildup and leaking.  Enlist the help of your end seal supplier to work through these issues and make sure that you are using the correct end seals for your application.

    When a chamber is leaking, a press operator will often try to fix the problem by increasing the load pressure instead of looking for the cause of the leak.  End seal leaks should never be resolved by increasing chamber pressure.  The additional pressure increases friction between the doctor blade and the anilox roll and causes both to wear prematurely.  Paying a little extra attention when installing doctor blades and end seals can prevent many leaks from occurring in the first place.  After installing new end seals, a press operator should evaluate the chamber and confirm that there is a snug end seal fit with no gaps or distortion.  The doctor blade should have some upward pressure to form an adequate seal, but not so much that it requires extra loading pressure to make contact with the anilox roller in the middle of the blade.

    End Seal Materials for Chamber  Systems

    There are various end seal materials which range in abrasion resistance, durability and solvent resistance.  Again, your end seal supplier is a good resource to help you determine the best material for your application:

      1. Foam seals are the most common and the least expensive type of end seals.  This material generally does not perform as well as other materials and may not be a good choice for long runs, higher press speeds and certain fluid chemistries.  There can also be a lot of variation in the density of the material which can range from super firm to more malleable.


      1. Neoprene or rubber seals offer longer life compared to foam seals.  They are compatible with aqueous and UV coatings & inks so they don’t have to be changed out between jobs.  However, these seals do not seat well due to the coefficient of friction between the material and the anilox roller surface.


    1. Pre-soaked felt end seals are a superior solution for resolving leaks.  These end seals are oversized for a snug fit and pre-soaked in petroleum to reduce friction and prevent  buildup.  Felt end seals are compatible with all ink and coating types, provide a tighter seal and typically last longer than rubber and foam seals.  Keeping felt seals lubricated with seal grease is key to their superior performance and longer life.  Felt end seals tend to dry out after the anilox  system is flushed with detergents and water.  Applying seal grease to the radius portion of the seals after flushing the system will ensure a tight fit and extend the life of the seals by reducing friction.

    Choosing the right seal material and design for your application and replacing end seals when necessary will help ensure that they do their job of keeping inks and coatings from leaking out of the chamber.  Better yet, the right seals will allow for proper doctor blade seating and a predictable and even transfer of fluid from the anilox roller to the blanket.  Despite their small cost, end seals have the power to save thousands of dollars in waste and downtime.

  • Optimizing Your Doctor Blade Trialing Process

    Optimizing Your Doctor Blade Trialing Process

    blank

    Testing a new doctor blade in your printing operation should be a collaboration with your suppler that boosts performance while avoiding costly guesswork. Instead of randomly ordering samples, follow a systematic, data-driven approach.

    Collaborate
    Start by sharing key details about your press—dimensions, machine model, blade holder type, ink specifics, and any pain points you are experiencing. This information lets your supplier recommend tailored doctor blades rather than generic samples.  There are a lot of options in terms of material type, thickness, and edge configuration.

    Run  Your  Trialman taking careful notes during a doctor blade trial
    Your supplier will likely send you one or more blades based on your provided data. Appreciate what these are and take care when testing them. They’re designed for your specific needs and should be used in a controlled production run.

    Crawl, Walk, Run

    Install and test the blades under normal operating conditions. Consider starting on a single print/coating station if the blade is new to you.  Contact your supplier with any questions related to setup or installation and alignment.  Clean the blade holder or chamber, using minimal blade pressure.

    Provide Feedback

    Complete any surveys your supplier has seeking feedback on the sample performance. Record important details and observations made during the testing related to blade longevity, metering quality, and any anomalies. Feedback is especially important if the blade fails as this can help your supplier make alternative recommendations by changing blade material, thickness, or edge configuration.

    The Takeaway
    An iterative, collaborative testing process is more efficient than random sampling. By working closely with your supplier—starting with detailed information, running controlled trials, carefully documenting results, and refining based on feedback—you achieve optimal performance and a long-term printing solution.  Embrace this method to streamline your doctor blade selection and keep your press running at peak efficiency.

    Trial a TruPoint Doctor Blade
  • Take Care of Your Doctor Blade Chamber and It Will Take Care of You!

    Take Care of Your Doctor Blade Chamber and It Will Take Care of You!

    Celmacch's carbon fiber chamber with TruPoint Green doctor blade
    Carbon fiber chamber system by Celmacch

    The job of a doctor blade chamber is to help deliver a precise, consistent ink film thickness to the substrate.  Like other parts of the press, the doctor blade chamber needs to be maintained and inspected on a regular basis to ensure its peak performance.  Taking the time to do this is a smart way to maximize press uptime and minimize costs.

    What Can Go Wrong

    1.  The chamber needs cleaning The doctor blade chamber requires regular cleaning to make sure it functions properly.  Dried ink and coating particles can interfere with doctor blade seating in the blade holder and cause the chamber to go out of alignment.

    2.  The doctor blade chamber is not aligned properly – The doctor blade and anilox roll work best together when there is light, consistent contact between the two.  If the blade does not have even contact with the roll due to chamber misalignment, it will not shear the ink cleanly and consistently from the anilox roll surface.

    doctor blade chamber corrosion
    Doctor blade chamber corrosion

    3.  There is corrosion or pitting in the chamber components – Over time, regular exposure to harsh cleaning chemicals can cause corrosion and pitting in parts of the chamber.  This can create recesses in the metal that prevent the blade from lying flat in the holder.  Pitting also makes cleaning difficult, and particles from a corroded chamber can dislodge, settle into the ink and score anilox rolls.

    4.  The chamber is bowed or warped – Due to the length of the doctor blade chamber, it can bow and become warped from being mishandled.  When bowing or warping occur, the blade will not lay flat along the full surface of the blade holder and contact the anilox roll uniformly when engaged.

    Oftentimes, the press operator may try to correct some of these issues by increasing pressure to force contact between the anilox roll and doctor blade.  While this may fix the problem temporarily, it often makes it worse.  The added friction from excessive blade-anilox contact can cause chamber leaks and accelerated wear on the blade and roll.

    What To Do

    1.  Clean the chamber – A cleaning routine involves wiping down the chamber with a cloth and flushing with approved cleaning solutions every day to remove ink deposits and particles from the doctor blade and blade clamp.  (This can take place when the press is shut down to clean the anilox roll which is also recommended on a daily basis.)

    2.  Verify chamber alignment – Operators should take the time to make sure the system is properly aligned and parallel on a regular basis.  This will prevent early and excessive doctor blade and anilox wear and ink leaks.  If aligned properly, the system will remain stable even at increasing press speeds.

    3.  Inspect the chamber for defects – Chamber bodies should be flat and straight.  This should be confirmed periodically (such as when other scheduled maintenance is taking place).  To check, take a long straight edge and lay it along the full length of the doctor blade.  Look for gaps which indicate that the chamber is bowed or warped.  Also, examine the blade mounting surface and holder for corrosion and pitting.  The chamber should be replaced if any of these conditions are evident.

    4.  Replace consumable parts – It is important to replace doctor blades and end seals when needed.  Skimping on these inexpensive consumables is penny-wise and pound-foolish!  Using new blades and seals to ensure a good contact area with the anilox roll and a tight chamber seal will prevent chamber leaks and anilox roll damage.

    5.  Standardize a cleaning and maintenance routine Establish a recommended schedule of cleaning and maintenance for the doctor blade chamber.  Make sure that procedures are documented and press operators are properly trained and evaluated.

    Tresu's E-Line carbon fiber chamber with TruPoint Orange doctor blade
    Tresu’s carbon fiber E-Line chamber

    6.  Convert to a carbon fiber chamber system – In addition to other benefits, carbon fiber chamber constructions, such as the ones pictured here by Celmacch and Tresu, offer superior resistance to corrosion and pitting.

    The doctor blade chamber is a precision tool that plays a vital role in producing a consistent product, and a regular routine of cleaning and maintenance will ensure its peak performance.  A small investment here will go a long way to guarantee that this press component does its part in keeping your bottom line healthy and your customers happy!


  • Cut-to-Length Doctor Blades Can Reduce Ink Chamber Leaks

    Cut-to-Length Doctor Blades Can Reduce Ink Chamber Leaks

    cut-to-length doctor bladesDoctor blade chamber leaks are costly in terms of downtime and waste.  While failed end seals are responsible for a large number of chamber leaks, ill-fitting doctor blades can also contribute to leaks.  Ordering cut-to-length doctor blades from your supplier is a smart way to reduce leaks, maximize doctor blade and end seal performance and save a printer thousands of dollars every year.

    Problems arising from Chamber Leaks:

    • Ink waste
    • Substrate waste
    • Excessive solvent consumption for clean-ups
    • Downtime for change-overs
    • Reduced doctor blade life
    • Scored anilox rolls
    • Increased end seal consumption

    Chamber leaks are a nuisance in the pressroom that cause frustration and reduce press efficiency.  When faced with a leaking chamber, a press operator has to stop the press and clean up the mess.  Often, he will try to fix the problem by increasing the load pressure instead of looking for the basic cause of the leak.  While this may work as a temporary solution, it can lead to other problems such as accelerated doctor blade and anilox wear.  The increased pressure may also force ink out of the ends of the chamber, making the situation worse.  Paying a little extra attention when installing doctor blades and ends seals can prevent many leaks from occurring in the first place.

    blankCauses of Chamber Leaks:

    • Improper seal material
    • Bad seal design
    • Lack of proper seal lubrication
    • No dead bands on anilox rolls
    • Anilox roll chips
    • Incorrect doctor blade length

    Failed end seals account for many chamber leaks.  Using an end seal material that is not compatible with the type of ink being used, the length of the run or the press speed will allow ink to escape from the ends of the chamber.  Ink build-ups can result from not using the appropriate lubrication to reduce friction between the anilox roll and end seal.  If the seals are not a proper fit, they will not do their job at containing ink within the confines of the chamber.  Working with your end seal supplier is a good way to work through these issues and ensure that you are using the correct end seals for your application. (View End Seal Brochure)

    The condition of the anilox roll can also play a role in chamber leaks.  If the roll lacks a dead band (an unengraved area) at each end, ink will build up there and cause the seals to fail.  Chips on the ends of the anilox rolls can also create ink buildup and compromise the integrity of the end seals.

    Incorrect Doctor Blade Length can cause Chamber Leaks

    In addition to failed end seals and defects in the anilox roll, doctor blades that are too short or too long

    blank
    Doctor blade is the correct length for the chamber

    can be another source of leaks.  When changing a doctor blade, it’s important to make sure that the new blade is the right size for the chamber and installed correctly.  If it’s not a perfect fit, the doctor blade provides a gap through which ink can leak out of the chamber.

    When properly installed, the doctor blade should have some upward pressure from the end seals to ensure a sufficient seal.  A very slight rise in the blade is okay, however, extra loading pressure should not be necessary to get the blade to wipe the center of the anilox roll.  

    When a blade is too short or too long for the chamber, it prevents the end seals from doing their job.  The blade should come to about halfway across the tops of the end seals when placed in the chamber.  If the blade does not reach the seals, then the seals can actually prevent contact between the doctor blade and the anilox roll.

    blank
    Doctor blades are too long for the chamber

    On the other hand, if the blade extends beyond the outer edge of the end seal, it may create a small opening between the underside of the blade and the end seal which creates a path for ink to flow out of the chamber.  If it’s too long, the blade may also become wavy and not lie flush with the roll, causing uneven metering and leaking.

    Installing doctor blades that are a perfect fit for the chamber will eliminate this source of leaks.  When ordering doctor blade material by the roll, it is important to confirm the proper blade specifications with your chamber OEM to make sure that press operators are cutting blades to the correct length.  An easier way to ensure the proper size is to order cut-to-length doctor blades from your supplier that are ready to install right out of the box.

    Cut-to-length Doctor Blades can Reduce Chamber Leaks

    Doctor blades that are the incorrect size for the chamber can be a frustrating source of chamber leaks, downtime and waste.  Installing blades correctly and making sure that they are the precise length according to OEM specifications is one way to prevent this problem.  Ordering cut-to-length doctor blades from your supplier will not only speed up blade changes but also ensure a perfect fit to maximize blade performance and minimize leaks.

    Request a Free TruPoint Doctor Blade Sample
  • Steel Doctor Blades Cause Anilox Roll Scoring and Injuries

    Steel Doctor Blades Cause Anilox Roll Scoring and Injuries

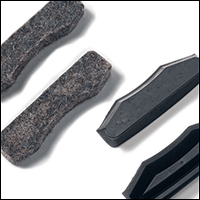
    Steel doctor blades are often the cause of anilox roll scoring and severe personal injuries. Switching to nonmetallic blades can not only ensure print quality and minimize waste, but also prolong the life of anilox rolls and reduce the risk of lost-time accidents.

    Anilox Roll Scoring from Steel Doctor Blades

    blank
    Score line on an anilox roll

    Steel doctor blades are the cause of many anilox roll scoring incidents. Improper blade installation and excessive blade pressure can cause small fragments of the metal blade to break away, become lodged against the roll and destroy rows of anilox cells as the roll turns.  The damaged area or “score line” appears as a thin band which runs around the circumference of the roll. The corresponding area of print will either show a dark or light streak depending on the depth and severity of the score line. Either way, the roll has to be resurfaced or replaced at a significant cost to the printer.

    To reduce anilox roll scoring from steel doctor blades:

    • Ensure the roll’s engraving is smooth when received from the anilox supplier
    • Filter inks using current magnet technology
    • Maintain a good anilox cleaning regimen
    • Ensure proper chamber alignment and blade installation
    • Change blades and end seals frequently

    Injuries from Steel Doctor Blades

    blankSteel doctor blades can also be blamed for a large number of pressroom injuries. As steel blades wear, their edges become honed through contact with the anilox roll. This leaves razor-sharp tips that pose a significant cut hazard. Press operators always need to be cautious when handling steel blades but especially careful when removing the worn blades from the press for this reason. There are substantial costs associated with accidents that occur on the job in addition to the emotional impact of a workplace injury. The cost of lost-time accidents from a steel doctor blade ranges from an increase in insurance rates and workman’s compensation claims to medical bills, labor replacement expenses and press downtime.

    When it comes to the pressroom, safety is everyone’s concern. To reduce the risk of injury and eliminate the risk of anilox roll scoring, consider switching to non-metallic blades instead.

  • 3 Steps to Ensure Proper Doctor Blade Alignment

    3 Steps to Ensure Proper Doctor Blade Alignment

    blank
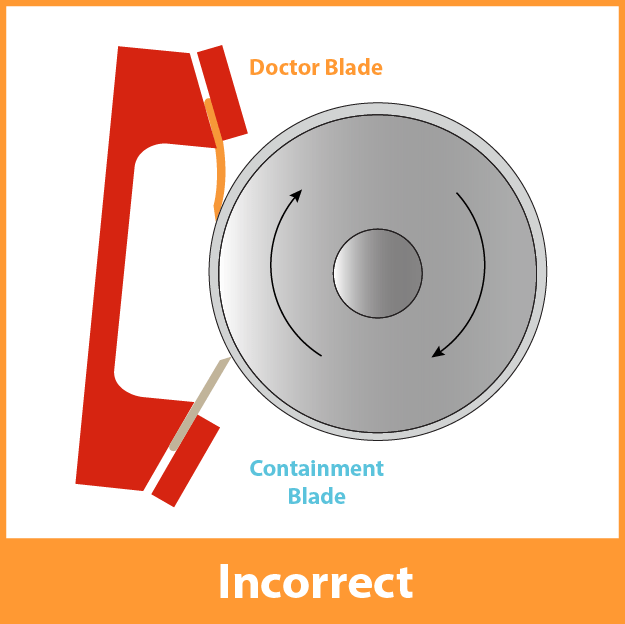
Proper alignment of your doctor blades(s) to the anilox roll (or any roll being wiped or cleaned) is critical to the performance of any ink or coating metering system. This alignment plays a pivotal role in preventing premature doctor blade and anilox roll wear, reducing leaks, and minimizing downtime. Let’s dive into the key aspects of blade alignment to optimize the performance of your process.

    Doctor Blade Functionality

    Doctor blades are designed to remove excess ink from the surface of the anilox roll. To achieve this, it’s imperative to maintain consistent, light contact between the doctor blade and the anilox roll along its entire face. Variation from this ideal contact can lead to problems including inconsistent transfer of ink or coating to the substrate and premature anilox roll wear.

    Causes of Incorrect Contact

    Several factors contribute to inconsistent contact between the doctor blade and the anilox roll:

    1. Blade / Blade Holder Alignment: Ensure the blade is not skewed, offset, or misaligned with the centerline of the anilox roll.
    2. Poor Blade Installation: Properly seat the blade in the holder and avoid overtightening to eliminate ripples or buckling of the blade.
    3. Inconsistent Pressure: Maintain even pressure across the blade holder to prevent variations in blade contact.
    Consequences of Incorrect Alignmentblank

    Deviation from proper alignment often shows up as uneven ink or coating thickness.  Frequently operators try to overcome this problem by increasing blade pressure to compensate for the underlying issue.

    This quick fix may temporarily address ink or coating problems but will eventually cause accelerated wear of both the doctor blade and anilox roll. Accelerated blade wear means more frequent blade changes and increased downtime. Accelerated wear of the anilox roll can lead to uneven or inconsistent ink or coating density.

    How to Check Doctor Blade Alignment
    1. Start with a clean blade doctor blade chamber (dual blade) or doctor blade holder (single blade) and make sure blades are installed firmly against stops, with no buckling.
    2. Slowly engage the blades against the anilox roll, and verify the blade-to-anilox contact occurs simultaneously across the blade face.
      • For dual-blade systems, there are (4) checkpoints; top and bottom blades at both ends of the doctor blade chamber.
      • For single-blade systems, there are (2) checkpoints at the left and right ends of the blade holder.
      • The goal is to make sure all checkpoints contact the anilox or coating roll at the same time.
    3. Adjust if necessary to achieve uniform simultaneous contact.

    Pro tips: When aligning a doctor blade chamber (dual blade), remove end seals to create an unobstructed view of blade and anilox contact.

    A feeler gauge (or business card!) is a great tool to help compare blade to anilox pressure.

    Maintaining proper doctor blade to roller alignment is fundamental to optimizing your ink or coating metering system. Avoid the temptation to increase blade pressure to overcome misalignment as this can lead to shortened blade life and accelerated anilox roll wear.

    By investing a few minutes in checking your setup, you’ll reap long-term benefits in terms of time, cost savings, and reduced waste. Remember, a well-aligned chamber ensures your doctor blade performs at its best, delivering exceptional results.

    For detailed instructions on doctor blade installation and visual guides, download our 3 Keys to Success Infographic.

    3 Keys to Success - Installing TruPoint Doctor Blades

    Download Infographic
  • Doctor Blade Installation: Correct Angle and Pressure are Needed for Consistent Performance

    Doctor Blade Installation: Correct Angle and Pressure are Needed for Consistent Performance

    The anilox roll and doctor blades are designed to work together to deliver a precise amount of ink to the plate. It is important to take time during a doctor blade installation in order to ensure print quality.

    A doctor blade that’s installed correctly will have uniform, balanced contact with the anilox roll and remove ink consistently across its surface. Blade positioning, orientation, angle and pressure will affect the delivery of a precise amount of ink to the plate, and proper installation will give the printer control over consistent, repeatable print quality.

    3 Keys To Doctor Blade Installation Success

    1. Handling

    It’s essential to handle the doctor blade with care to prevent damage. Additionally, make sure to clean the surface of the doctor blade holder before inserting the blade.

    2. Orientation

    It is essential that the metering and containment blades be positioned correctly when they are installed. Depending on the rotation of the anilox roll, the metering blade could be positioned on the top or the bottom of the chamber. Keep in mind that the metering blade is always the last blade to contact the roll before the ink transfers to the plate. The containment blade is installed in the opposite location. If the two blades are installed in reverse, the metering blade will not achieve the appropriate point of contact with the roll and remove the correct amount of ink before transfer. It is important to remember that the MicroTip or bevel should point away from the roll or towards the chamber to prevent streaking.

    The angle at which the blade comes into contact with the anilox roll is also crucial to proper doctor blade installation and optimum blade performance. Ideally, the contact angle should be 30° tangent to the anilox roll circumference. In reverse angle and chamber blade applications, the doctor blade angle should be between 28° and 32°. If the blade angle drops below 28°, a larger part of the blade’s edge will come into contact with the roll. When this happens, the contact area is too big to meter effectively and the blade may allow ink to pass underneath or “hydroplane” at high speeds. If the angle exceeds 32°, it will result in faster wear on the blade.

    3. Pressure

    When a doctor blade chamber is properly aligned, light pressure between the anilox roll and doctor blade is all that’s needed to produce a clean wiping action. In fact, applying the lightest possible pressure necessary to maintain sealing and metering will produce the best results. Excess pressure can cause a deterioration in print quality, wasted ink and substrate, and accelerated.

    blade and anilox wear. A good way to tell if you’re using the correct amount of doctor blade pressure is to look at the roll once it’s inked. Before increasing pressure, the anilox roll will appear glossy. This is a sign that too much ink is remaining on the surface. Pressure should be increased gradually until a satin finish appears on the surface of the roll. A satin finish is a good indication that the correct amount of pressure has been achieved and the doctor blade is effectively shearing the excess ink from the roll. If pressure is increased beyond this point, the doctor blade edge will bend and hydroplane. The roll will again begin to look glossy because it is flooded with too much ink.

    The doctor blade plays a key role in the performance of the anilox roll and the printer’s control over print quality. Take the time to double-check blade positioning, orientation, pressure and angle during doctor blade installation to guarantee that the anilox roll delivers the precise volume of ink for which it was designed.

    Download Now: Free 3 Keys to Success Installation Infographic
    Download Our 3 Keys to Success Infographic!