Category: Doctor Blades

  • UV Ink Spitting is a Dirty Habit

    As competition for shelf space heats up, brand owners are looking to create more compelling-looking products. That means prettier graphics, more vivid colors and unique packaging. Today’s narrow web printers, also facing intense competition, are turning to UV inks and specialty coating formulas to produce higher print quality, speed up turnaround times, increase throughput and reduce downtime. Unfortunately, using a steel doctor blade to meter these chemistries often result in the UV ink spitting onto your print job, causing a speckled appearance. Where steel falls short, the TruPoint Orange® next generation doctor blade may be the solution in these applications.

    Eliminate UV Ink Spitting with TruPoint Orange

    The surface energy and flexibility of a steel blade can impede a smooth transfer of ink to the plate. The dyne level of a steel blade is higher than that of TruPoint Orange, causing the ink to have a greater tendency to adhere to the blade. With Orange, the characteristics of the material give the blade a significantly lower dyne level than steel, decreasing the attraction between the doctor blade and ink and facilitating a more fluid movement of ink to the plate.

    ink spitting steel doctor blades vs plastic doctor bladesAlso, UV ink has a normal viscosity of 5-7 times that of water and solvent-based inks, and its thixotropic properties (ability to thin out when agitated) make it transfer differently on press. This thicker consistency applies excessive pressure to a steel metering blade, often causing the ink to sling off, or “spit,” especially at high press speeds. The TruPoint Orange doctor blade prevents UV ink spitting. The blade’s tip provides enough stiffness to maintain a strong contact area with the anilox roll and prevent ink from sliding under the blade.

    Specialty Inks and Coatings Are Abrasive

    Specialty coatings and tactile finishes such as glitter, pearlescent, textures and soft touch, are being used to enhance the look of product packages, but the same challenging properties of UV inks also exist in these formulations. They have high viscosities and contain large particles, making it difficult to accurately control the volume being applied. These chemistries, and coarse anilox surfaces used to apply them, are extremely abrasive to steel doctor blades – printers consume blades faster which increases downtime and costs. TruPoint Orange next generation polymer blades are highly abrasion-resistant and chemically compatible with all ink and specialty coating formulas; they last longer and minimize press downtime for blade changes. Click Here to Read “5 Ways to Conquer UV Ink Spitting”

    As the industry evolves to keep up with the demands of the market, printers are faced with new challenges. The ink and coating formulas being used to make products stand out on the retail shelf and improve pressroom efficiency are difficult to meter with steel doctor blades. Due to its material properties and tip design, TruPoint Orange can help by reducing downtime and costs associated with UV ink spitting and accelerated blade wear.

    Request a Free TruPoint Doctor Blade Sample
  • Plastic Doctor Blades – Advanced Polymers Compete with Steel

    Plastic Doctor Blades – Advanced Polymers Compete with Steel

    While steel doctor blades used to be the only option to produce high-end graphics, a printer had to deal with the shorter blade life and pressroom injuries that came along with using the material. No more! Recent innovations in materials technology and tip engineering have at last resulted in polymer doctor blades that can compete with steel and also resolve a number of common problems in the pressroom.

    Steel doctor blades are thin and rigid which allows them to achieve a fine contact area with the anilox roll. A fine contact area is required for the blade to achieve an effective wipe on high line screen rolls used in more demanding graphics applications. Traditional plastic doctor blades, on the other hand, have long been preferred for their longer life in less demanding graphics applications. Plastic blades had to be engineered thicker in order to provide enough rigidity to maintain good contact with the anilox roll and achieve a sufficient wipe. The thickness and larger contact area prevented these blades from being effective when used to meter mid to high line screen rolls. While they lasted significantly longer and were safer to handle than steel blades, they tended to leave more ink on the surface of the roll; this produced dot gain and poor image quality in the printed piece.

    Steel Blade Disadvantages

    Despite its reputation for being the superior metering material, steel has many disadvantages. The blades wear quickly and need to be replaced frequently. Operators are also exposed to cut hazards when removing the worn blades from the press, and the metal fragments can come loose and score anilox rolls.  The environmental impact of using steel can also be significant. There are huge energy costs associated with the manufacture of steel blades as well as anilox resurfacing, and additional station clean-ups generate a lot of contaminated waste. Despite these drawbacks, steel was believed to be the only doctor blade option to execute a clean wipe on a high line screen anilox roll, leaving printers no choice.

    New polymer doctor blade contact area is smaller than steel

    New Polymer Doctor Blades

    Today, specially formulated polymer doctor blades offer the best of both steel and plastic. Unlike traditional plastic doctor blades, the next generation material allows for a precisely engineered micro-tip which wears slowly and evenly throughout the life of the blade. The micro-tip edge allows the blade to achieve a fine contact area with the anilox roll and deliver effective metering on line screens up to 2000 lpi or 785 L/cm. The long and steady wear period of the next generation polymer doctor blade maximizes press uptime and allows for consistent ink film thickness for the duration of the print job.

    Compared to steel, the polymer material does not develop a dangerous cutting edge after use, and the worn blades are safe to handle. Also, the material will not separate, splinter or crack and produces no metal fragments that can lodge between the doctor blade and the anilox roll. A reduction in anilox scoring means better image quality, less downtime, less waste and lower roll replacement costs.

    Polymer doctor blades have come a long way in recent years. A combination of advanced materials and a micro-tip edge has produced revolutionary new doctor blade option for printers: a blade that can compete with steel in the most demanding graphics applications while retaining the safety and blade life benefits of traditional plastic.

    Request a Free TruPoint Doctor Blade Sample
  • UHMW Users Upgrade to DuraPoint for Longer Blade Life

    Flexo Concepts’ exclusive TruPoint DuraPoint™ blade is a next-generation UHMW doctor blade with a proprietary high-density formulation for superior blade life and enhanced graphics. Used in applications that require extended blade life, DuraPoint has been shown to last 25-30% longer than traditional UHMW products and is a direct replacement as both a metering and a containment blade.

    Upgrade from UHMW to DuraPoint

    DuraPoint’s construction makes it ideal for printers who produce moderate graphics but want the added benefit of longer blade life. The properties of the material allow it to maintain more consistent metering throughout the life of the blade for increased graphics requirements. By upgrading To DuraPoint, corrugated printers can increase press uptime while maintaining all the benefits provided by traditional UHMW.

    DuraPoint is available in the same widths and thicknesses as Flexo Concepts’ UHMW blade and offers a drop-in replacement for standard UHMW. The blade fits in existing blade clamp configurations, requiring no shims or modifications to the holder.

    Flexo Concepts is the leading global supplier of UHMW products. DuraPoint and Green are the company’s premier products for corrugated applications that demand longer blade life and enhanced graphics.


  • Steel Doctor Blades Cause Anilox Roll Scoring and Injuries

    Steel Doctor Blades Cause Anilox Roll Scoring and Injuries

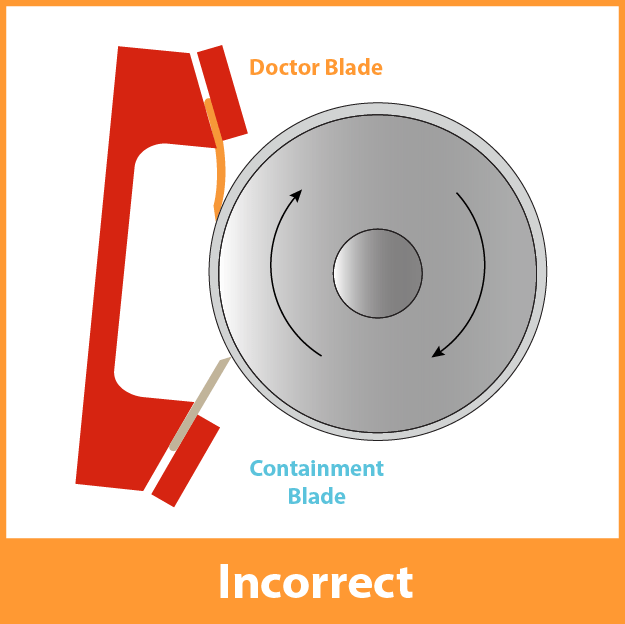
    Steel doctor blades are often the cause of anilox roll scoring and severe personal injuries. Switching to nonmetallic blades can not only ensure print quality and minimize waste, but also prolong the life of anilox rolls and reduce the risk of lost-time accidents.

    Anilox Roll Scoring from Steel Doctor Blades

    Score line on an anilox roll

    Steel doctor blades are the cause of many anilox roll scoring incidents. Improper blade installation and excessive blade pressure can cause small fragments of the metal blade to break away, become lodged against the roll and destroy rows of anilox cells as the roll turns.  The damaged area or “score line” appears as a thin band which runs around the circumference of the roll. The corresponding area of print will either show a dark or light streak depending on the depth and severity of the score line. Either way, the roll has to be resurfaced or replaced at a significant cost to the printer.

    To reduce anilox roll scoring from steel doctor blades:

    • Ensure the roll’s engraving is smooth when received from the anilox supplier
    • Filter inks using current magnet technology
    • Maintain a good anilox cleaning regimen
    • Ensure proper chamber alignment and blade installation
    • Change blades and end seals frequently

    Injuries from Steel Doctor Blades

    Steel doctor blades can also be blamed for a large number of pressroom injuries. As steel blades wear, their edges become honed through contact with the anilox roll. This leaves razor-sharp tips that pose a significant cut hazard. Press operators always need to be cautious when handling steel blades but especially careful when removing the worn blades from the press for this reason. There are substantial costs associated with accidents that occur on the job in addition to the emotional impact of a workplace injury. The cost of lost-time accidents from a steel doctor blade ranges from an increase in insurance rates and workman’s compensation claims to medical bills, labor replacement expenses and press downtime.

    When it comes to the pressroom, safety is everyone’s concern. To reduce the risk of injury and eliminate the risk of anilox roll scoring, consider switching to non-metallic blades instead.

  • 3 Steps to Ensure Proper Doctor Blade Alignment

    3 Steps to Ensure Proper Doctor Blade Alignment

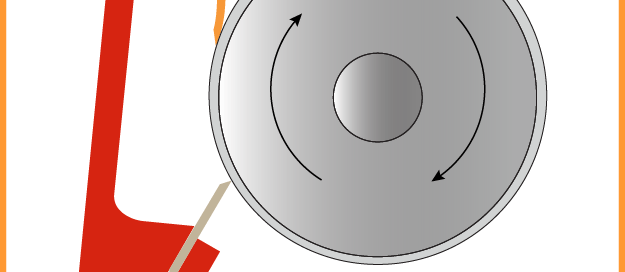
    Proper alignment of your doctor blades(s) to the anilox roll (or any roll being wiped or cleaned) is critical to the performance of any ink or coating metering system. This alignment plays a pivotal role in preventing premature doctor blade and anilox roll wear, reducing leaks, and minimizing downtime. Let’s dive into the key aspects of blade alignment to optimize the performance of your process.

    Doctor Blade Functionality

    Doctor blades are designed to remove excess ink from the surface of the anilox roll. To achieve this, it’s imperative to maintain consistent, light contact between the doctor blade and the anilox roll along its entire face. Variation from this ideal contact can lead to problems including inconsistent transfer of ink or coating to the substrate and premature anilox roll wear.

    Causes of Incorrect Contact

    Several factors contribute to inconsistent contact between the doctor blade and the anilox roll:

    1. Blade / Blade Holder Alignment: Ensure the blade is not skewed, offset, or misaligned with the centerline of the anilox roll.
    2. Poor Blade Installation: Properly seat the blade in the holder and avoid overtightening to eliminate ripples or buckling of the blade.
    3. Inconsistent Pressure: Maintain even pressure across the blade holder to prevent variations in blade contact.
    Consequences of Incorrect Alignment

    Deviation from proper alignment often shows up as uneven ink or coating thickness.  Frequently operators try to overcome this problem by increasing blade pressure to compensate for the underlying issue.

    This quick fix may temporarily address ink or coating problems but will eventually cause accelerated wear of both the doctor blade and anilox roll. Accelerated blade wear means more frequent blade changes and increased downtime. Accelerated wear of the anilox roll can lead to uneven or inconsistent ink or coating density.

    How to Check Doctor Blade Alignment
    1. Start with a clean blade doctor blade chamber (dual blade) or doctor blade holder (single blade) and make sure blades are installed firmly against stops, with no buckling.
    2. Slowly engage the blades against the anilox roll, and verify the blade-to-anilox contact occurs simultaneously across the blade face.
      • For dual-blade systems, there are (4) checkpoints; top and bottom blades at both ends of the doctor blade chamber.
      • For single-blade systems, there are (2) checkpoints at the left and right ends of the blade holder.
      • The goal is to make sure all checkpoints contact the anilox or coating roll at the same time.
    3. Adjust if necessary to achieve uniform simultaneous contact.

    Pro tips: When aligning a doctor blade chamber (dual blade), remove end seals to create an unobstructed view of blade and anilox contact.

    A feeler gauge (or business card!) is a great tool to help compare blade to anilox pressure.

    Maintaining proper doctor blade to roller alignment is fundamental to optimizing your ink or coating metering system. Avoid the temptation to increase blade pressure to overcome misalignment as this can lead to shortened blade life and accelerated anilox roll wear.

    By investing a few minutes in checking your setup, you’ll reap long-term benefits in terms of time, cost savings, and reduced waste. Remember, a well-aligned chamber ensures your doctor blade performs at its best, delivering exceptional results.

    For detailed instructions on doctor blade installation and visual guides, download our 3 Keys to Success Infographic.

    3 Keys to Success - Installing TruPoint Doctor Blades

    Download Infographic
  • Doctor Blade Installation: Correct Angle and Pressure are Needed for Consistent Performance

    Doctor Blade Installation: Correct Angle and Pressure are Needed for Consistent Performance

    The anilox roll and doctor blades are designed to work together to deliver a precise amount of ink to the plate. It is important to take time during a doctor blade installation in order to ensure print quality.

    A doctor blade that’s installed correctly will have uniform, balanced contact with the anilox roll and remove ink consistently across its surface. Blade positioning, orientation, angle and pressure will affect the delivery of a precise amount of ink to the plate, and proper installation will give the printer control over consistent, repeatable print quality.

    3 Keys To Doctor Blade Installation Success

    1. Handling

    It’s essential to handle the doctor blade with care to prevent damage. Additionally, make sure to clean the surface of the doctor blade holder before inserting the blade.

    2. Orientation

    It is essential that the metering and containment blades be positioned correctly when they are installed. Depending on the rotation of the anilox roll, the metering blade could be positioned on the top or the bottom of the chamber. Keep in mind that the metering blade is always the last blade to contact the roll before the ink transfers to the plate. The containment blade is installed in the opposite location. If the two blades are installed in reverse, the metering blade will not achieve the appropriate point of contact with the roll and remove the correct amount of ink before transfer. It is important to remember that the MicroTip or bevel should point away from the roll or towards the chamber to prevent streaking.

    The angle at which the blade comes into contact with the anilox roll is also crucial to proper doctor blade installation and optimum blade performance. Ideally, the contact angle should be 30° tangent to the anilox roll circumference. In reverse angle and chamber blade applications, the doctor blade angle should be between 28° and 32°. If the blade angle drops below 28°, a larger part of the blade’s edge will come into contact with the roll. When this happens, the contact area is too big to meter effectively and the blade may allow ink to pass underneath or “hydroplane” at high speeds. If the angle exceeds 32°, it will result in faster wear on the blade.

    3. Pressure

    When a doctor blade chamber is properly aligned, light pressure between the anilox roll and doctor blade is all that’s needed to produce a clean wiping action. In fact, applying the lightest possible pressure necessary to maintain sealing and metering will produce the best results. Excess pressure can cause a deterioration in print quality, wasted ink and substrate, and accelerated.

    blade and anilox wear. A good way to tell if you’re using the correct amount of doctor blade pressure is to look at the roll once it’s inked. Before increasing pressure, the anilox roll will appear glossy. This is a sign that too much ink is remaining on the surface. Pressure should be increased gradually until a satin finish appears on the surface of the roll. A satin finish is a good indication that the correct amount of pressure has been achieved and the doctor blade is effectively shearing the excess ink from the roll. If pressure is increased beyond this point, the doctor blade edge will bend and hydroplane. The roll will again begin to look glossy because it is flooded with too much ink.

    The doctor blade plays a key role in the performance of the anilox roll and the printer’s control over print quality. Take the time to double-check blade positioning, orientation, pressure and angle during doctor blade installation to guarantee that the anilox roll delivers the precise volume of ink for which it was designed.

    Download Now: Free 3 Keys to Success Installation Infographic
    Download Our 3 Keys to Success Infographic!