 Installing your TruPoint Orange doctor blade incorrectly will result in disaster. Well, not really. But it will create headaches for the press operator and waste valuable resources. It will also prevent you from getting the maximum value from your doctor blade investment.
The TruPoint Orange doctor blade is a lifesaver in many pressrooms when it comes to eliminating UV ink spitting and start-up lines, reducing the frequency of blade changes and offering a safe alternative to steel blades. However, the blade requires a bit more finesse than steel when it’s being installed in order to work its magic.
Principles of proper doctor blade installation
It goes without saying that the surface the blade will rest on should be clean, so the blade can firmly rest against the blade stops. Also, tightening the blade clamp screws starting in the middle and working outward is a good way to get a uniform fit.
But, if we had to name the three most important factors to keep in mind when installing a TruPoint Orange doctor blade, it would be handling, orientation and pressure. That’s not to say that other considerations such as angle and alignment aren’t important. It’s just that these particular variables, if not executed properly, will almost always foretell the failure of the blade.
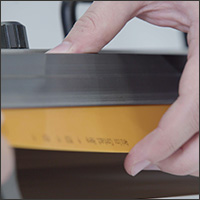
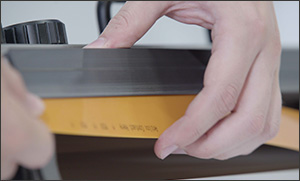
1. Protecting the blade edge
A press operator should take care to protect the integrity of any doctor blade (and his or her own safety when using steel) during blade transit, storage and installation. But particular caution should be exercised to keep a MicroTip® edge from coming in contact with anything that may damage it.
The MicroTip on an Orange blade is amazing in its ability to achieve and maintain a fine area of contact with the anilox roll 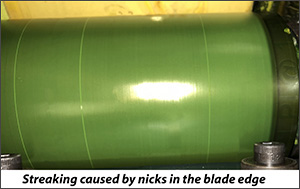 surface. After all, this is the driving force behind the blade’s ability to match the metering performance of a steel blade. Its material is also incredibly tough, able to stand up to the abrasiveness of even the harshest chemistries like high titanium white inks and special coating formulas. But some of the same characteristics that give the TruPoint Orange doctor blade its awesome wiping power and durability also make its MicroTip vulnerable to nicks when handled or stored improperly. Once the edge is compromised, the blade can cause printing defects such as continuous streaks, marks and lines on the substrate. Keep the blade safe and always run your finger along the leading edge of the blade to ensure no imperfections are present before locking it into place. (Remember, there is no danger of cutting yourself with a TruPoint Orange doctor blade!)
2. Correct blade orientation
To reap the full performance benefits of the TruPoint Orange blade, the blade must be installed with correct orientation. When 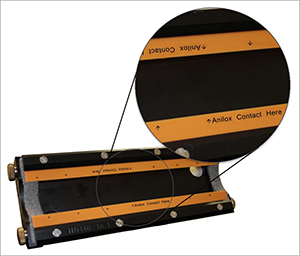 they are manufactured, TruPoint Orange blades are imprinted with text to guide you when you install them. It is important that the MicroTip edge is pointed away from the roll, with the text facing towards you and the arrows pointing to the anilox. It’s simple – if you can’t read the text, the blade is installed the wrong way. A blade that’s installed “backwards,” (with the MicroTip facing towards the roll), will not make even contact along the anilox roll and result in streaking on the printed piece. If your Orange blade is beveled, the bevel should face the inside of the chamber, or away
 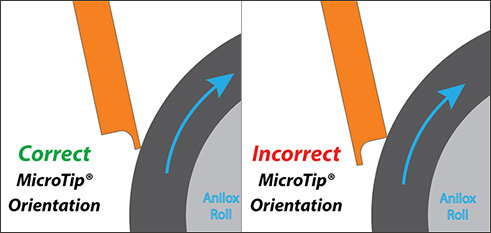 from the roll, when properly installed. If using a doctor blade chamber, the containment blade should be the first to touch the anilox roll and the metering blade, second.
3. Minimal blade pressure
Assuming a doctor blade chamber is properly aligned, much less blade pressure is needed to get a clean wipe of the roll with a plastic doctor blade than with a steel one. For best results, find the minimum amount of blade pressure required to contact the anilox surface when installing TruPoint Orange. Unlike with steel, TruPoint Orange should generate few or no streaks on the anilox when starting up. Minimizing blade pressure against the anilox roll will not only ensure print quality but also extend blade life (and end seal life if applicable).
A good way to gauge the correct amount of doctor blade pressure is to look at the roll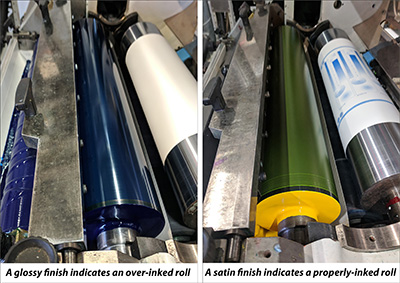 once it’s inked. Before the clamp is tightened, the anilox roll will appear glossy – a sign that too much ink is remaining on the surface. Blade pressure should be increased gradually until a satin finish appears on the surface of the roll. A dull sheen is a good indication that the correct amount of pressure has been achieved and the doctor blade is effectively shearing the excess ink from the roll. If pressure is increased beyond this point, the doctor blade edge will bend, and contact area with the roll will grow. The anilox surface will begin to look glossy again or show light streaks or lines because it is being flooded with too much ink. At this point, lessening blade pressure, rather than increasing it, will alleviate the issue.
When a TruPoint Orange blade is installed properly, its metering power is brilliant in terms of executing consistent print quality over the life of the blade. Take care to ensure the three key elements of success – proper blade handling, correct blade orientation and the right amount of blade pressure – and your TruPoint Orange doctor blade will likely become your press operator’s new best friend.