Category: Wide Web

  • Steel Doctor Blades Cause Anilox Roll Scoring and Injuries

    Steel Doctor Blades Cause Anilox Roll Scoring and Injuries

    Steel doctor blades are often the cause of anilox roll scoring and severe personal injuries. Switching to nonmetallic blades can not only ensure print quality and minimize waste, but also prolong the life of anilox rolls and reduce the risk of lost-time accidents.

    Anilox Roll Scoring from Steel Doctor Blades

    Score line on an anilox roll

    Steel doctor blades are the cause of many anilox roll scoring incidents. Improper blade installation and excessive blade pressure can cause small fragments of the metal blade to break away, become lodged against the roll and destroy rows of anilox cells as the roll turns.  The damaged area or “score line” appears as a thin band which runs around the circumference of the roll. The corresponding area of print will either show a dark or light streak depending on the depth and severity of the score line. Either way, the roll has to be resurfaced or replaced at a significant cost to the printer.

    To reduce anilox roll scoring from steel doctor blades:

    • Ensure the roll’s engraving is smooth when received from the anilox supplier
    • Filter inks using current magnet technology
    • Maintain a good anilox cleaning regimen
    • Ensure proper chamber alignment and blade installation
    • Change blades and end seals frequently

    Injuries from Steel Doctor Blades

    Steel doctor blades can also be blamed for a large number of pressroom injuries. As steel blades wear, their edges become honed through contact with the anilox roll. This leaves razor-sharp tips that pose a significant cut hazard. Press operators always need to be cautious when handling steel blades but especially careful when removing the worn blades from the press for this reason. There are substantial costs associated with accidents that occur on the job in addition to the emotional impact of a workplace injury. The cost of lost-time accidents from a steel doctor blade ranges from an increase in insurance rates and workman’s compensation claims to medical bills, labor replacement expenses and press downtime.

    When it comes to the pressroom, safety is everyone’s concern. To reduce the risk of injury and eliminate the risk of anilox roll scoring, consider switching to non-metallic blades instead.

  • 3 Steps to Ensure Proper Doctor Blade Alignment

    3 Steps to Ensure Proper Doctor Blade Alignment

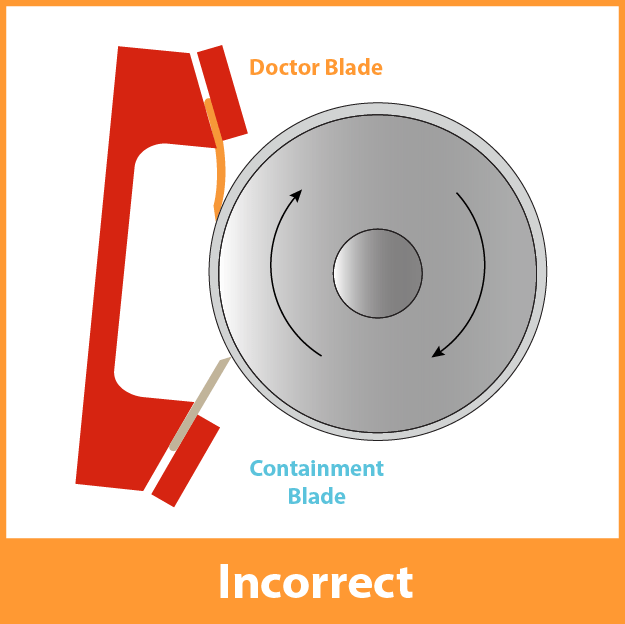
    Proper alignment of your doctor blades(s) to the anilox roll (or any roll being wiped or cleaned) is critical to the performance of any ink or coating metering system. This alignment plays a pivotal role in preventing premature doctor blade and anilox roll wear, reducing leaks, and minimizing downtime. Let’s dive into the key aspects of blade alignment to optimize the performance of your process.

    Doctor Blade Functionality

    Doctor blades are designed to remove excess ink from the surface of the anilox roll. To achieve this, it’s imperative to maintain consistent, light contact between the doctor blade and the anilox roll along its entire face. Variation from this ideal contact can lead to problems including inconsistent transfer of ink or coating to the substrate and premature anilox roll wear.

    Causes of Incorrect Contact

    Several factors contribute to inconsistent contact between the doctor blade and the anilox roll:

    1. Blade / Blade Holder Alignment: Ensure the blade is not skewed, offset, or misaligned with the centerline of the anilox roll.
    2. Poor Blade Installation: Properly seat the blade in the holder and avoid overtightening to eliminate ripples or buckling of the blade.
    3. Inconsistent Pressure: Maintain even pressure across the blade holder to prevent variations in blade contact.
    Consequences of Incorrect Alignment

    Deviation from proper alignment often shows up as uneven ink or coating thickness.  Frequently operators try to overcome this problem by increasing blade pressure to compensate for the underlying issue.

    This quick fix may temporarily address ink or coating problems but will eventually cause accelerated wear of both the doctor blade and anilox roll. Accelerated blade wear means more frequent blade changes and increased downtime. Accelerated wear of the anilox roll can lead to uneven or inconsistent ink or coating density.

    How to Check Doctor Blade Alignment
    1. Start with a clean blade doctor blade chamber (dual blade) or doctor blade holder (single blade) and make sure blades are installed firmly against stops, with no buckling.
    2. Slowly engage the blades against the anilox roll, and verify the blade-to-anilox contact occurs simultaneously across the blade face.
      • For dual-blade systems, there are (4) checkpoints; top and bottom blades at both ends of the doctor blade chamber.
      • For single-blade systems, there are (2) checkpoints at the left and right ends of the blade holder.
      • The goal is to make sure all checkpoints contact the anilox or coating roll at the same time.
    3. Adjust if necessary to achieve uniform simultaneous contact.

    Pro tips: When aligning a doctor blade chamber (dual blade), remove end seals to create an unobstructed view of blade and anilox contact.

    A feeler gauge (or business card!) is a great tool to help compare blade to anilox pressure.

    Maintaining proper doctor blade to roller alignment is fundamental to optimizing your ink or coating metering system. Avoid the temptation to increase blade pressure to overcome misalignment as this can lead to shortened blade life and accelerated anilox roll wear.

    By investing a few minutes in checking your setup, you’ll reap long-term benefits in terms of time, cost savings, and reduced waste. Remember, a well-aligned chamber ensures your doctor blade performs at its best, delivering exceptional results.

    For detailed instructions on doctor blade installation and visual guides, download our 3 Keys to Success Infographic.

    3 Keys to Success - Installing TruPoint Doctor Blades

    Download Infographic
  • Doctor Blade Installation: Correct Angle and Pressure are Needed for Consistent Performance

    Doctor Blade Installation: Correct Angle and Pressure are Needed for Consistent Performance

    The anilox roll and doctor blades are designed to work together to deliver a precise amount of ink to the plate. It is important to take time during a doctor blade installation in order to ensure print quality.

    A doctor blade that’s installed correctly will have uniform, balanced contact with the anilox roll and remove ink consistently across its surface. Blade positioning, orientation, angle and pressure will affect the delivery of a precise amount of ink to the plate, and proper installation will give the printer control over consistent, repeatable print quality.

    3 Keys To Doctor Blade Installation Success

    1. Handling

    It’s essential to handle the doctor blade with care to prevent damage. Additionally, make sure to clean the surface of the doctor blade holder before inserting the blade.

    2. Orientation

    It is essential that the metering and containment blades be positioned correctly when they are installed. Depending on the rotation of the anilox roll, the metering blade could be positioned on the top or the bottom of the chamber. Keep in mind that the metering blade is always the last blade to contact the roll before the ink transfers to the plate. The containment blade is installed in the opposite location. If the two blades are installed in reverse, the metering blade will not achieve the appropriate point of contact with the roll and remove the correct amount of ink before transfer. It is important to remember that the MicroTip or bevel should point away from the roll or towards the chamber to prevent streaking.

    The angle at which the blade comes into contact with the anilox roll is also crucial to proper doctor blade installation and optimum blade performance. Ideally, the contact angle should be 30° tangent to the anilox roll circumference. In reverse angle and chamber blade applications, the doctor blade angle should be between 28° and 32°. If the blade angle drops below 28°, a larger part of the blade’s edge will come into contact with the roll. When this happens, the contact area is too big to meter effectively and the blade may allow ink to pass underneath or “hydroplane” at high speeds. If the angle exceeds 32°, it will result in faster wear on the blade.

    3. Pressure

    When a doctor blade chamber is properly aligned, light pressure between the anilox roll and doctor blade is all that’s needed to produce a clean wiping action. In fact, applying the lightest possible pressure necessary to maintain sealing and metering will produce the best results. Excess pressure can cause a deterioration in print quality, wasted ink and substrate, and accelerated.

    blade and anilox wear. A good way to tell if you’re using the correct amount of doctor blade pressure is to look at the roll once it’s inked. Before increasing pressure, the anilox roll will appear glossy. This is a sign that too much ink is remaining on the surface. Pressure should be increased gradually until a satin finish appears on the surface of the roll. A satin finish is a good indication that the correct amount of pressure has been achieved and the doctor blade is effectively shearing the excess ink from the roll. If pressure is increased beyond this point, the doctor blade edge will bend and hydroplane. The roll will again begin to look glossy because it is flooded with too much ink.

    The doctor blade plays a key role in the performance of the anilox roll and the printer’s control over print quality. Take the time to double-check blade positioning, orientation, pressure and angle during doctor blade installation to guarantee that the anilox roll delivers the precise volume of ink for which it was designed.

    Download Now: Free 3 Keys to Success Installation Infographic
    Download Our 3 Keys to Success Infographic!